Whether you’re a corporate marketing team or an advertising agency, Microsoft Dynamics Marketing delivers powerful, integrated marketing management solutions that can help you better understand your customers. With Microsoft Dynamics Marketing you’ll get exceptional insight, control over budgets and resources, and be able to create automated, measurable multi-channel campaigns to deliver tangible results.
Microsoft Dynamics Marketing is good for marketing related activities and generating Leads while on other hand Microsoft Dynamics CRM is great for working the all sort of marketing data weather it a sales (Lead-to-Opportunity), service (activity to incident) life cycle.
Spring’ 14 brought to us Microsoft Dynamics Marketing Connector for connecting these two products and excel the business with (306)2 degree view of your business. J
Microsoft Dynamics Marketing Connector for Dynamics CRM allows to:
- Connects MDM and CRM thereby allowing marketing data to be synchronized between these two applications.
- Leverages a managed solution for CRM which customizes a CRM organization to support the connector.
Pre-requisites:
- Microsoft Dynamics CRM 2011/2013/2015
- Microsoft Dynamics Marketing
- Microsoft Azure
- Microsoft Dynamics Marketing Connector for CRM
Steps involved:
- Download and install required connector resources
- Check “Integration Services” for your MDM
- Configure the MDM-CRM Connector
- Testing
Download and install connector resources
Download required connector resources
- Microsoft Dynamics Marketing Connector for Dynamics CRM is available for download at http://www.microsoft.com/en-us/download/details.aspx?id=43108
- Select the required components from the list and download to local drive.

- Extract the required connector.msi.

Installing the Connector
- Navigate to where you downloaded the files, double click the file “Microsoft Dynamics Marketing 17.0.3711 – CRM Connector.msi” (In my case as I’m using CRM 2015) and Install.
- In the dialog click Next

- Read and accept the term and conditions and click next.

- If required Browse to a new location for the installation files and click Next.
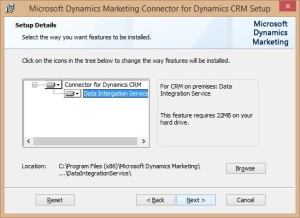
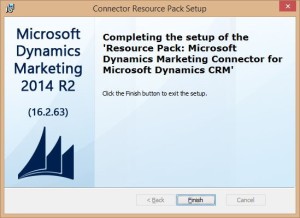
- Wait for the extraction to get completed.

- Click Finish
- Unless provided explicitly, the default extract location is

Installing the connector solution to your CRM environment
- Open the CRM environment and navigate to Settings –> Solutions

- Click Import and Click Choose File
- Navigate to the folder C:\Program Files (x86)\Microsoft Dynamics Marketing\Connector for Microsoft Dynamics CRM and select the file DynamicsMarketingConnectorSolution_managed.zip
- Verify you selected the correct file and click Next

- Let the import process complete
- Click Close and verify the solution has been installed
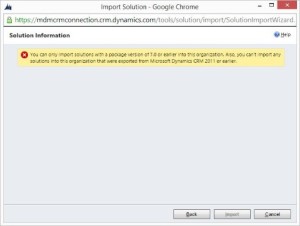
Note: You may get below error while importing the solution if CRM 2011/2013 connector solution is selected for CRM 2015 environment.
Important: After the “Dynamics Marketing Connector for Dynamics CRM” solution is installed in your CRM, you must create/update a ‘connector user’ in CRM. This user must be assigned the “Dynamics Marketing Connector” security role. The “Dynamics Marketing Connector” security role is created when the Dynamics Marketing solution is installed in Dynamics CRM.

Check “Integration Services” for your Microsoft Dynamics Marketing
MDM connector can only be configured when Integration Services are enabled for your MDM environment. These services are only deployed in your MDM instance by Microsoft upon request.
- To check whether the service is enabled or not, navigating to Settings -> Integration Options in MDM
- The Status indicator at the top of the “Settings” page indicates the status of integration services for your MDM
- Blue checkmark indicates that integration services are enabled.

- Red checkmark indicates that Integration Services are not been deployed yet for your MDM instance.

Note: Follow Appendix “How to configure Integration Services for Microsoft Dynamics Marketing for Office 365 admin portal” for steps to request Microsoft Support for the configuration.
Configure the MDM-CRM connector
- To facilitate access to CRM from MDM via the Connector Service you must define a CRM Endpoint in MDM. The account you enter for the endpoint is used by the “Integration services” to create and change entities in the CRM system.
- In MDM, navigate to Home -> Settings -> Integration Options to open the “Integration Settings” page.
- In the “CRM Endpoint” section, click the Configuration button to open the “Configure CRM Account for Access by the Connector Service” dialog.

Note: The “Configure CRM Account for Access by the Connector Service” is a model dialog and not supported by Chrome 37 and higher version. Tri using IE browser if configuration button does not respond on Chrome browser.
- Provide the URL for your CRM Service and the credentials of your Connector account. You can click Verify to test that the credentials you have entered are valid. Click Submit to save and close.

- Verify if MDM and CRM Listener services are enabled for your MDM instance on same settings page under Services Section.

- If these services are disabled, click on first highlighted arrow from left to enable MDM Listener, MDM Publisher and CRM Listener. The second arrow is to enable SDK Service.

- On clicking Ok, the services will be enabled for configuration.

- In the “Service Bus” section click the Configuration button to open the “Configure Windows Azure for Microsoft Dynamics Marketing” dialog.

Note: Please see Appendix “Configure an Azure namespace to serve as the transportation channel” if you don’t have a preconfigured Azure namespace with ACS.
- In the “Configure Windows Azure for Microsoft Dynamics Marketing” dialog
- Enter the service bus namespace in the “Azure Namespace field”
- Enter a name for the “Queue from Dynamics CRM”, eg “CRM2MDM”
- Enter a name for the “Queue from Dynamics Marketing “, eg “MDM2CRM”
- Click Configure Azure ACS to open the “Provide Credentials for configuring the Azure Service Bus” dialog.

- In the “Provide Credentials for configuring the Azure Service Bus” dialog you must provide a number of administrative credentials in order to setup the secured trust relationship between the integration service and your CRM system through your Azure service bus. None of these administrative credentials will be ever stored. They will be used for an automated configuration, which eases the configuration immensely.
- Type or paste the Azure Management key in the “Management Key” field.
- Enter the CRM Certificate issuer name in the “Dynamics CRM certificate issuer name” field. You can find the issuer name from your CRM Online system under Settings –> Customizations –>Developer Resources.

- Download the certificate file from CRM (see screenshot above) and Upload the certificate file in the third field on the Azure service bus configuration dialog.
- Enter the credentials of an administrative account of your CRM system.
- Click OK to save and close the “Provide Credentials for configuring the Azure Service Bus” dialog and return to the “Configure Windows Azure for Microsoft Dynamics Marketing” dialog.

- Click Submit to save and close the “Configure Windows Azure for Microsoft Dynamics Marketing” dialog.
- Verify in the “Services” sections in the Integration settings page that you now have three service roles running:
- “MDM Listener” – listens for messages in the Azure Service Bus queue that indicate changes to make to data contained in Dynamics Marketing
- “MDM Publisher” – publishes messages to the Azure Service Bus queue to indicate changes that need to be made in Dynamics CRM
- “CRM Listener” – listens for messages that indicate a change needs to be processed in CRM. This role retrieves the messages from the Azure Service Bus queue and then executes a request against the CRM Organization Service to complete the change.

- The final step for your configuration is the initial synchronization. On the “Settings” page, scroll down to the “Initial Synchronization” section and click the arrow button and select Yes.

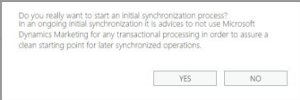
- Wait until this step has completed.

- You might need to refresh the “Settings” page a few times until the step is marked as complete.

Testing
- Create a new Marketing Contact in MDM by navigating to Marketing Execution à Marketing Contact.

- Save the contact and switch to CRM. Navigate to Sales à Contacts and search for the newly created record.

- Update the email address field for the same contact in CRM and save.

- Check the same contact in MDM for the change.
Resources:
Appendix: Configure an Azure namespace to serve as the transportation channel
Follow below steps for creating an Azure namespace with ACS on your existing Microsoft Azure subscription.
- Open Microsoft Azure PowerShell. Download if not already installed.
- Type > Add-AzureAccount to connect to your presubscribed Azure account.

- Enter the email address and credentials for your Azure account and wait till the PowerShell connects.

- Type > New-AzureSBNamespace
- Upon prompt provide Namespce name and Type as below.

- Use this namespace and Default Key for MDM configuration with Azure.
Appendix: How to configure Integration Services for Microsoft Dynamics Marketing for Office 365 admin portal
Follow below steps for requesting the Integration Services to be deployed for Microsoft Dynamics Marketing instance.
- In the “Office 365 admin center” click Support in the left navigation panel and select Service Requests.
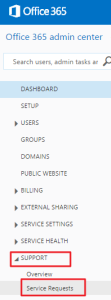
- Click “+” to create a new Service Request (SR) with the following settings:
- Issue Type = “Technical Support”
- Service = “Dynamics Marketing”
- Service Area = “Connector”
- Problem area = “Connector Setup installation”
- Title = (type a title for your SR)
- Description = (include a description – good idea to include the URL of your MDM instance)
- Contact Name
- Contact Phone Number
- A member of the support team might call you to verify the request details. As soon as the connector service has been deployed, you will see the blue checkmark.


